Basic MYSQL Utilising DB Setup

Please note that this tutorial is part of the Build Your Own Site series of tutorials. Some of it relies on some of our previous lessons.
In this tutorial we'll be referring to the concepts learned in some of our introduction tutorials. Feel free to revisit some of the enrionment setup lessons. Especially the installation of LAMP tutorial. We discussed how LAMP is an acronym for Linux Apache Mysql and PHP.
So far we've utilised everything in that acronym except for MySQL. In this tutorial we'll be setting up our own Database and using it to save that processed data from the previous tutorial.
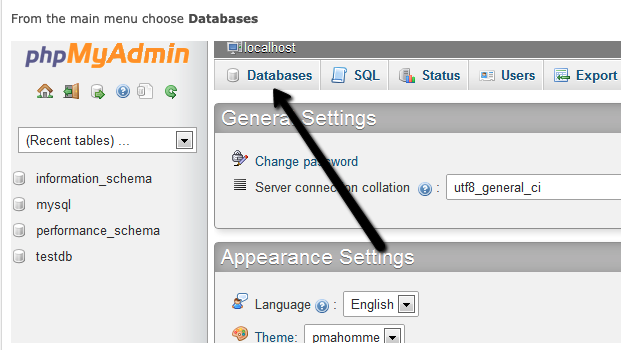
Open your PHPMyAdmin installation and login using the credentials you used on setup.
These should be the user root and some password. If you didn't setup a password, you should be able to login without using it.
If you're struggling to log in, please see these tutorials:
Alright ... Now that you're in your MYSQL environment. We're gonna be creating your first database. It's not gonna be anything special just a database with a single table. We'll try and create a variety of fields to get you started!
Please note that in this turorial we we'll not be focusing on MYSQL itself, just how to use it for a database. The next lesson we'll try and expand a bit more on this.
Click the add database button on the PHPMyAdmin interface as shown in the screen below:

You can select InnoDB as the database storage type and name that database pressphp.
Aanndd voila! You have just created your first Database.
Feel free to twirl around and sing "Everybody dance now!" in a high pitched voice.
And back to business. Our pressphp database is empty so we are going to add a table to it. The table will have to an x number of fields, to store the x number of input values from the previous tutorial.
We'll create our first table and name it form. Because we'll be using it to see the form input values we'll be submitting. Please note that you can name the table or the database whatever you like. And once we're done with this tutorial you can create a new database and multiple tables to get yourself aquainted with how all of this works.
"Alright,okay ... " - Denzel Washington ...
Play around with PHPMyAdmin. Try and create the table and add diffrent types of fields to it. For instance the name field will be a varchar field that you can upto 255 chars. This just means that you can have anything alphanuemeric in there.
Take a look, try and follow the illustrations. In time you'll get used to it.
Play around on PHPMyAdmin a little. When you get back we'll show how to deal with saving that form data in the database.
"Remember to take your time and learn as much as you can. The point is to get comfortable with MYSQL and PHPMyAdmin."
The Village Geek
As you might have noticed, we've left a lot of steps for you to figure out on your own.
PhpMyAdmin has a lot of material online. Feel free to gather up as much as you can, and try to create a field for each of the form inputs.
For instance; the `name` field would be a `varchar`, the `range` field could be an `int` field etc. Play around with the formats and try to compare against other tables on the web.
Remember to take your time and learn as much as you can. The point is to get comfortable with MYSQL and PHPMyAdmin.
Cape Town, South Africa
